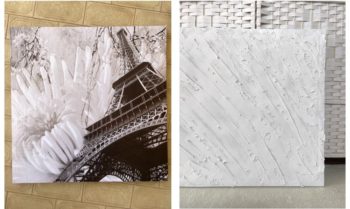
Lately I’ve been seeing a lot of different styles of simple, white textured canvas pieces pop up on Pinterest & Instagram, and admittedly I wasn’t really sure if I liked them at first, but they’ve really grown on me! When looking online, they can range anywhere from $100 all the way up to $1,000 plus, and I came across a few others who had DIY’d it, so I thought I’d give it a shot! I remembered that I had this square Eiffel Tower canvas that I bought over 10 years ago, and had it sitting in the garage for at least the last couple of years, so I didn’t even have to buy the canvas for this project which was a bonus.
In the end it only took all up less than 30 minutes, I had such a great time being creative and having fun with it, and I love how it turned out! It was also such an easy DIY, but I’ll go in depth below on what I used and how I did it if you want to try it out too!
What You'll Need:

To start with, you’ll need a canvas in whatever size you like. Stores like Spotlight have a big range of shapes and sizes, or you could even repurpose an old canvas like I did. If you don’t have one laying around but want to repurpose one, you could check out your local thrift stores like the Salvos, Good Sammy’s etc, as I’m sure they would have some.
When it came to adding the texture to the canvas, I picked up Spakfilla by Selleys, but you could use any similar filler product, or even Plaster of Paris.
And lastly, when it comes to painting the canvas, you can choose whatever colour you like, and either in a regular paint or spray paint formula. I used a white spray paint since I had a bit of can left to use, but I didn’t really enough in the end, so might go back over it in a white paint at some point.
How To:

To start with, I just smeared a whole bunch of the Spakfilla on until most of the canvas was covered. I didn’t really have a method and just put it on in a messy way, but I wasn’t so sure that I loved it, so I started to drag the spatula in a dragging motion upwards on an angle.
Once I had dragged up on each section I was really happy with how it turned out. It was still messy which I wanted, but it now had a bit of a flow to it.
After leaving it to dry for about 30 minutes, I went over it all with white spray paint to finish it off. As I mentioned above, I ran out of spray paint, so at some stage I will probably go over it again with another layer of paint.
But after it was dry, that was it! Super easy!!

The Finished Result:

Such a quick, easy and affordable DIY, and I am so happy with how it turned out! I can’t wait until our current build is done so I can hang it on the wall, and to be honest probably make some more! I’m so fussy with art/ painting/ photos on the wall and really struggle to find items I like, so I feel like this is such a great option – simple, neutral but still a bit of something will all of the texture.
Hopefully this has inspired you to try it out too! ♡

Thanks Jo I’m definitely going to try this one out – I’m with you so hard to find affordable stylish artwork
Oh I’m so glad to hear! It’s such a fun & easy DIY project, hope you enjoy it too xx
http://www.santa4.su/gallery/image/620-3/
https://hrv-club.ru/forums/index.php?autocom=gallery&req=si&img=6885
https://honda-fit.ru/forums/index.php?autocom=gallery&req=si&img=7040
https://myteana.ru/forums/index.php?autocom=gallery&req=si&img=6695
https://myteana.ru/forums/index.php?autocom=gallery&req=si&img=6642
http://terios2.ru/forums/index.php?autocom=gallery&req=si&img=4725
http://terios2.ru/forums/index.php?autocom=gallery&req=si&img=4725
http://terios2.ru/forums/index.php?autocom=gallery&req=si&img=4564
https://vitz.ru/forums/index.php?autocom=gallery&req=si&img=4836
http://terios2.ru/forums/index.php?autocom=gallery&req=si&img=4561
http://passo.su/forums/index.php?autocom=gallery&req=si&img=4258
https://vitz.ru/forums/index.php?autocom=gallery&req=si&img=4821
http://passo.su/forums/index.php?autocom=gallery&req=si&img=4258
https://mazda-demio.ru/forums/index.php?autocom=gallery&req=si&img=6567
http://toyota-porte.ru/forums/index.php?autocom=gallery&req=si&img=3362
http://terios2.ru/forums/index.php?autocom=gallery&req=si&img=4809
http://terios2.ru/forums/index.php?autocom=gallery&req=si&img=4827
http://wish-club.ru/forums/index.php?autocom=gallery&req=si&img=5487
http://terios2.ru/forums/index.php?autocom=gallery&req=si&img=4844
http://fabnews.ru/blog/8434.html
Al Fakher – #Музыкадлядуши скачать и слушать песню https://shorturl.fm/JNYN1
Nebezao & Андрей Леницкий – Как ты там (SerG ProJecT & DJ DeN PoZitiVe RemiX) скачать бесплатно и слушать онлайн https://shorturl.fm/KPgwK
The Amba – Сердце скачать и слушать песню бесплатно https://shorturl.fm/xVcpc
Чи-Ли – Спасенья нет скачать и слушать онлайн https://shorturl.fm/yjeER
Абай Бегей & Улыкпан Жолдасов – Алтынай скачать песню бесплатно в mp3 и слушать онлайн https://shorturl.fm/MDywi
Красные Маки – Так случилось скачать mp3 и слушать онлайн https://shorturl.fm/TIlHU
https://mazda-demio.ru/forums/index.php?autocom=gallery&req=si&img=6505
http://wish-club.ru/forums/index.php?autocom=gallery&req=si&img=5434
https://mazda-demio.ru/forums/index.php?autocom=gallery&req=si&img=6621
http://toyota-porte.ru/forums/index.php?autocom=gallery&req=si&img=3296
https://hrv-club.ru/forums/index.php?autocom=gallery&req=si&img=7045
https://honda-fit.ru/forums/index.php?autocom=gallery&req=si&img=7067
http://terios2.ru/forums/index.php?autocom=gallery&req=si&img=4575
https://honda-fit.ru/forums/index.php?autocom=gallery&req=si&img=7237
https://honda-fit.ru/forums/index.php?autocom=gallery&req=si&img=7341
https://mazda-demio.ru/forums/index.php?autocom=gallery&req=si&img=6544
https://honda-fit.ru/forums/index.php?autocom=gallery&req=si&img=7210
https://mazda-demio.ru/forums/index.php?autocom=gallery&req=si&img=6522
http://terios2.ru/forums/index.php?autocom=gallery&req=si&img=4851
http://wish-club.ru/forums/index.php?autocom=gallery&req=si&img=5328
https://hrv-club.ru/forums/index.php?autocom=gallery&req=si&img=7001
http://wish-club.ru/forums/index.php?autocom=gallery&req=si&img=5340
Криспи feat. Экси & Sunami – Не Попала скачать бесплатно и слушать онлайн https://shorturl.fm/xPHhw
Игорь Азовский – Нечаянная Радость скачать и слушать mp3 https://shorturl.fm/LKhnl
Idris & Leos – Неприятели скачать и слушать mp3 https://shorturl.fm/sOF2L
5sta Family – Дистанция скачать и слушать песню https://shorturl.fm/cK8IB
Султан Лагучев – Любовь-Беда скачать и слушать песню бесплатно https://shorturl.fm/dymGY
IVAN – Розами скачать и слушать песню https://shorturl.fm/ydzle